Calibrate AR Range BJ thermostats
ADJUSTMENT OF BYPASS (MINIMUM BURNER) FLAME
This is the flame which must be maintained on the burners when the griddle has reached the temperature set on the dial. Enough gas must be bypassed by the control to keep the entire burner lit. The thermostat regulates the flame from high to low in accordance with the griddle temperature and will automatically turn down to this bypass flame when the temperature set on the dial is attained.
Special care should be taken to see that the thermostat bulb is in its proper place and no part of the capillary tube is in any flame or heat zone. The griddle plate should never be removed without first removing the thermostat bulb(s) from beneath the plate. Never allow capillary tube to be kinked or crushed.
Watch our How to Video Here

THE BYPASS MUST BE SET CAREFULLY AND ACCURATELY AS FOLLOWS:
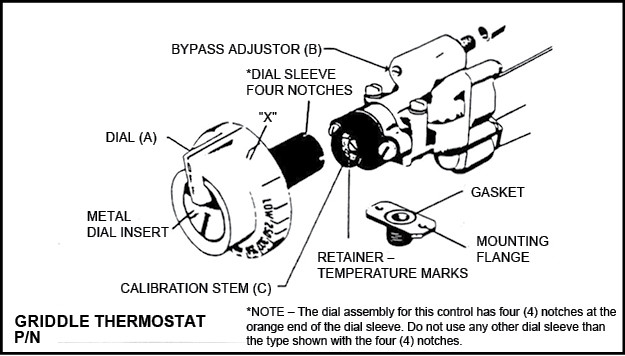
1. Light burners and turn Dial (A) counterclockwise and to a point midway between the “Gas On” mark and the next graduation to the right of it (shown by “X”). If the burner goes out entirely, the bypass is closed.
2. Slip off Dial (A). Remove the valve panel from the front of the range.
3. With a screwdriver, turn bypass adjustor (B). Turning it counterclockwise increases the bypass flame; turning it clockwise decreases the bypass flame. Adjust until there is a flame approximately 1/8″ high over the entire burner.
4. Replace dial, rotating dial clockwise until it snaps into its original position.
5. Reinstall the valve panel on front of the range.
GRIDDLE THERMOSTAT CALIBRATION CHECK:
The griddle temperature should be checked or recalibrated with the griddle hot. NOTE: See “Adjustment of Bypass (Minimum Burner) Flame” before recalibrating this thermostat.
HOT CHECK METHOD:
1. Place reliable thermometer in center of the top of the griddle over the thermal bulb.
2. Set Dial (A) to 350°F.
3. Wait until temperature rises and remains constant.
4. If dial does not agree with thermometer readings, slip off Dial (A) and push out metal insert.
5. Replace dial, turn to 350°F mark.
6. Hold dial firmly, insert screwdriver through center of dial and push calibration stem (C) inward. DO NOT TURN THIS STEM.
7. While holding calibration stem (C) in firmly with screwdriver, turn dial until it is shown by the thermometer. Release pressure on calibration stem Replace dial insert.
OVEN THERMOSTAT
The Model BJ Robertshaw is a combination thermostat and gas valve. The gas is turned on and the temperature setting is made by a single rotation of the dial. This valve automatically locks itself in the “OFF” position. To use, push dial inward, rotate counterclockwise to the desired temperature. To shut gas off, rotate clockwise to “OFF” position.
This thermostat is a precision instrument carefully made and properly calibrated (i.e. the dial is properly set) at the factory to control temperatures accurately. It should control temperatures for the proper cooking of food without recalibration. The calibration of this thermostat should not be changed until considerable experience with cooking results has definitely proved that the thermostat is not maintaining the proper temperature.

ADJUSTMENT OF BYPASS (MINIMUM BURNER) FLAME
This is the flame that must be maintained on the burners when the oven has come up to the temperature set on the dial. Enough gas must be bypassed by the control to keep the entire burner lit. The thermostat regulates the flame from high to low in accordance with the oven temperature and will automatically turn down to this bypass flame when the temperatures set on the dial is attained in the oven.

THE BYPASS MUST BY SET CAREFULLY AND ACCURATELY AS FOLLOWS:
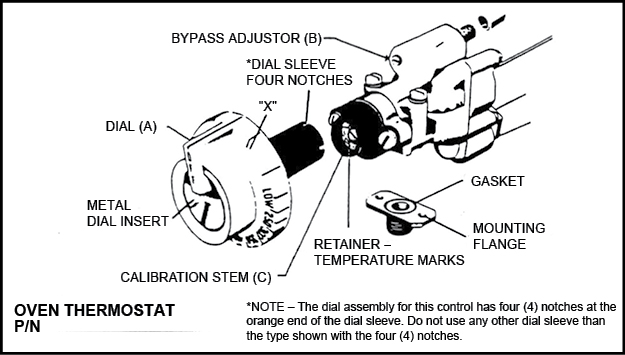
1. Light burners and turn Dial (A) counterclockwise and to a point midway between the “Gas On” mark and next graduation to the right of it (shown by “X”). If the burner goes out entirely, the bypass is closed.
2. Slip off Dial (A). Remove valve panel from front of range.
3. With a screwdriver, turn Bypass Adjuster (B).
Turning it counterclockwise increases the bypass flame; turning it clockwise decreases the bypass flame. Adjust until there is a flame approximately 1/8″ high over the entire burner.
4. Replace dial, rotating dial clockwise until it snaps into its original position.
5. Reinstall valve panel on front of range.
OVEN THERMOSTAT CALIBRATION CHECK
The oven temperature should be checked or recalibrated with oven hot. NOTE: see “Adjustment of Bypass (Minimum Burner) Flame” above before recalibrating this thermostat.
HOT CHECK METHOD:
1. Place reliable thermometer in center of oven.
2. Set Dial (A) at 350°F.
3. Wait until temperature rises and remains constant.
4. If dial noes not agree with thermometer readings, slip off Dial (A) and push out metal insert.
5. Replace dial, turn to 350°F mark.
6. Hold dial firmly, insert screwdriver through center of dial and push calibration stem (C) inward. DO NOT TURN THIS STEM.
7. While holding calibration stem (C) in firmly with screwdriver, turn dial until it is set at the actual oven temperature as shown by your test instrument or thermometer. Release pressure on calibration stem. Replace dial insert.


